Schematik build
How to Build a Tiny OLED Desk Command Centre
A small ESP32 status screen you can message from your browser
Schematik
Published May 29, 2026 · Updated June 12, 2026
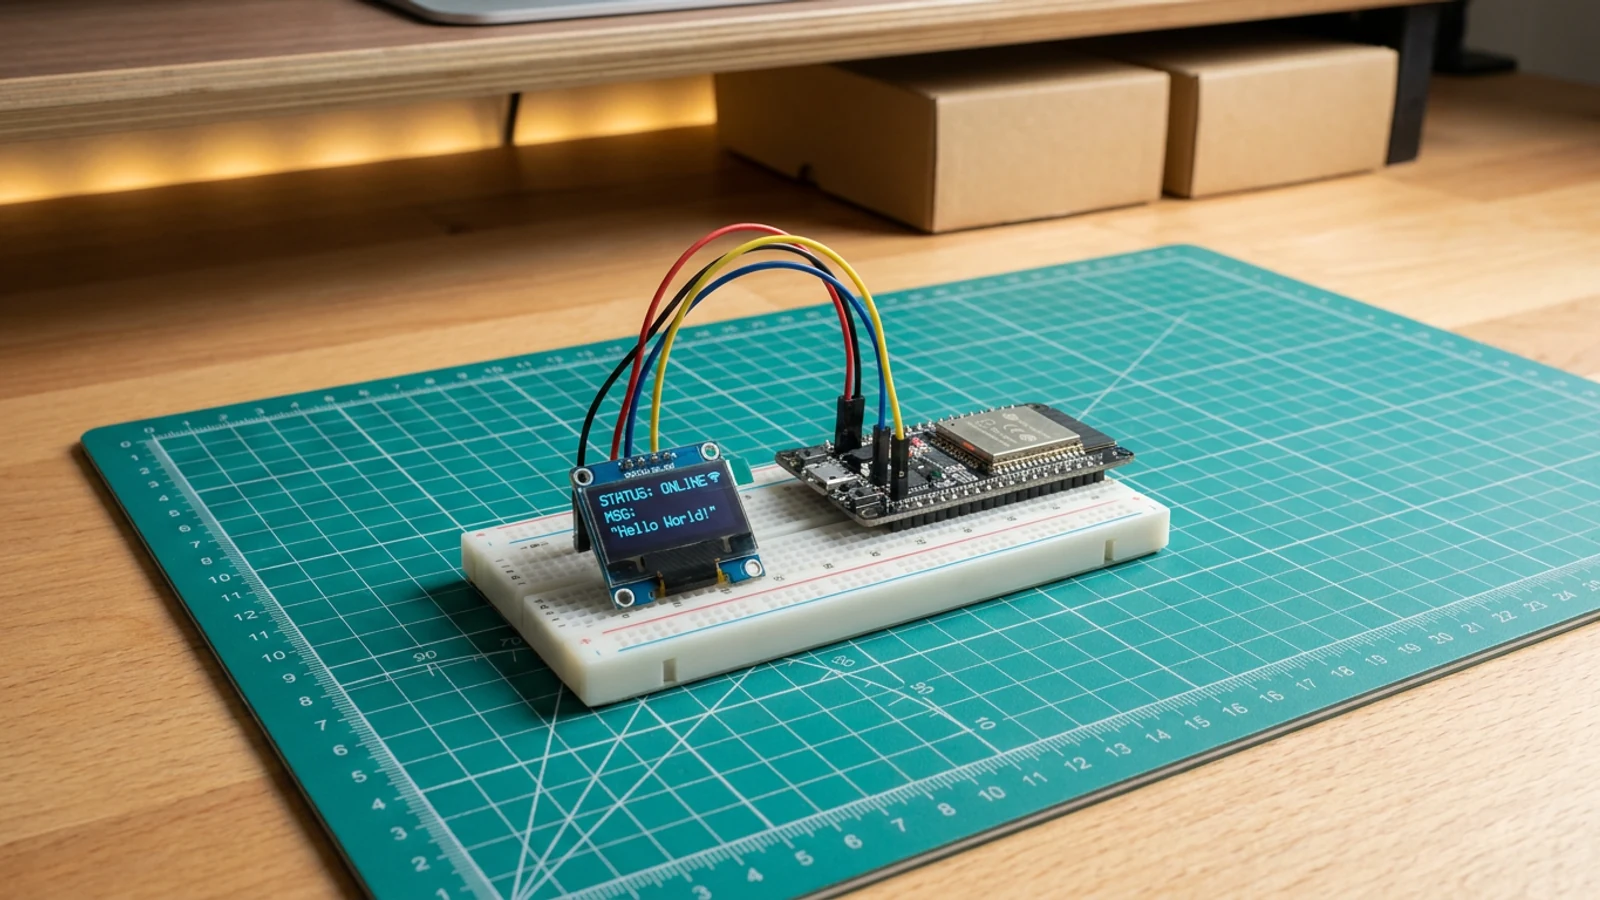
What you'll build
This guide builds a tiny desk command centre: an ESP32 with an SSD1306 OLED that shows the current time, today's weather, and a custom message sent from any browser on the same network. It is a practical desk object, not a screen test sketch.
The scope is deliberately small: one OLED over I²C, Wi-Fi for NTP and weather, a minimal built-in web page for sending messages, and repeated serial printing of the device IP so you can find the board after flashing. The firmware cycles between a live dashboard and any custom message for eight seconds, then returns to the dashboard automatically.
Use it as a meeting sign, a focus mode reminder, or a friendly "do not disturb" notice. The hardware fits on a small breadboard and needs no soldering.
What you are building
This is a single-screen Wi-Fi display. The firmware has four jobs:
- connect to Wi-Fi, sync time over NTP, and keep a live clock on the OLED,
- fetch current weather from Open-Meteo every ten minutes (no API key required),
- serve a minimal web page on port 80 so any device on the same network can post a short message,
- print the ESP32 IP address to Serial Monitor on connect and every 30 seconds so you can always find the device.
Out of scope: persistent storage, authentication, cloud push notifications, and multi-display coordination. Those are natural extensions once the single device is reliable.
Upload and calibrate
Open the project in Schematik and edit the marked constants before flashing:
WIFI_SSIDandWIFI_PASSWORD— your network credentials.TZ_OFFSET_SEC— your UTC offset in seconds (UTC+1 = 3600, UTC−5 = −18000).DST_OFFSET_SEC— daylight-saving offset in seconds (3600 if your region observes it, 0 otherwise).WEATHER_LATandWEATHER_LON— decimal-degree coordinates for the weather fetch. The defaults are London (51.5074, −0.1278).
After flashing, open Serial Monitor at 115200 baud. You should see Connected. IP: 192.168.x.x within a few seconds, followed by weather output such as Weather: 14°C Partly cloudy. The IP address repeats every 30 seconds — bookmark it on your phone for quick access. Navigate to http://<ip> in any browser on the same network, type a message, and press Send to OLED. The message takes over the screen for 8 seconds, then the normal dashboard returns.
If the display stays blank, Serial Monitor will print SSD1306 not found — check wiring on GPIO21/22. Recheck the four wires and confirm VCC is on 3V3.
Troubleshooting
- OLED stays blank, no Serial error: confirm GND is shared and VCC is on 3V3. Reseat the SDA/SCL wires on GPIO 21 and GPIO 22.
SSD1306 not foundin Serial Monitor: the I²C address may differ from 0x3C. Run an I²C scanner sketch to confirm, then updateOLED_I2C_ADDRin the code.- Wi-Fi never connects: check
WIFI_SSIDandWIFI_PASSWORDfor typos. The ESP32 only supports 2.4 GHz networks. - Clock shows wrong time: verify
TZ_OFFSET_SECandDST_OFFSET_SEC. The NTP sync runs at startup; a reboot after correcting the offsets is the quickest fix. - Weather shows "weather...": the first fetch runs shortly after NTP sync. If it stays stuck, check that the board can reach the internet; some networks block outbound HTTP on port 80.
- Cannot reach the web page: the IP printed in Serial Monitor may change if your router reassigns it. Set a DHCP reservation for the ESP32's MAC address for a stable local URL.
Going further
Once the basic display is working, the natural next step is to drive the content from something more specific to your workflow. The web endpoint already accepts POST requests, so any script on your machine — a calendar poller, a build-status hook, a message from your phone's shortcuts — can push text to the screen without changing the firmware. On the hardware side, adding a second OLED over the same I²C bus (with a different address) gives you a two-zone display: one for the clock and weather, one for messages.
Wiring diagram
Interactive · read-onlyPan and zoom to explore the wiring. Remix the project to edit it in your own workspace.
Parts list
Bill of materials| Component | Qty | Notes |
|---|---|---|
| ESP32 development board | 1 | ESP32 development board |
| SSD1306 OLED display | 1 | SSD1306 OLED display |
| Jumper wires | 1 | Jumper wires |
Assembly
6 stepsWire the OLED display
Connect the SSD1306 OLED display to the ESP32 development board using four jumper wires: VCC to the 3V3 rail, GND to a GND rail, SDA to GPIO21, and SCL to GPIO22.
- Tip: Most 0.96-inch SSD1306 modules run on 3.3 V. Confirm the label on your board before powering.
- Tip: Keep the I2C wires short (under 20 cm) to avoid signal integrity issues at the default 100 kHz clock.
- ⚠ Do not connect VCC to the ESP32's 5 V (VIN) pin — the SSD1306 is a 3.3 V device and may be damaged.
Check power and common ground
Confirm that GND on the OLED and GND on the ESP32 are joined on the same rail. Both the OLED VCC and the ESP32 3V3 pin share the same 3.3 V regulator output, so no separate supply is needed.
- Tip: A breadboard makes it easy to share the GND rail between modules without any soldering.
Edit Wi-Fi credentials and location
Open code.cpp and update WIFI_SSID and WIFI_PASSWORD to match your network. Optionally adjust WEATHER_LAT and WEATHER_LON to your coordinates (decimal degrees) and set TZ_OFFSET_SEC to your UTC offset in seconds.
- Tip: Open-Meteo is free and requires no API key — just accurate lat/lon values.
- Tip: For UTC+1 set TZ_OFFSET_SEC = 3600; for UTC−5 set TZ_OFFSET_SEC = −18000.
- Tip: DST_OFFSET_SEC handles daylight saving — set to 3600 if your region observes it, 0 if not.
Flash the firmware
Connect the ESP32 to your computer with a USB cable, select the correct port in your IDE (or let PlatformIO detect it), and upload the firmware. Open Serial Monitor at 115200 baud.
- Tip: If the upload stalls, hold the BOOT button on the ESP32 during the first few seconds of the upload, then release it.
Confirm startup in Serial Monitor
Watch the Serial Monitor for the device IP address — it prints on connect and repeats every 30 seconds so you can always find the device. You should see lines like 'Connected. IP: 192.168.x.x' and 'Weather: 14°C Partly cloudy'.
- Tip: If the OLED shows 'SSD1306 not found', recheck the SDA/SCL wires on GPIO21 and GPIO22.
Send a message from your browser
On any device on the same Wi-Fi network, open a browser and navigate to the IP address printed in Serial Monitor (e.g. http://192.168.1.42). Type a message and press 'Send to OLED'. The message takes over the screen for about 8 seconds before the normal dashboard returns.
- Tip: Bookmark the IP on your phone for quick access as a desk notifier or meeting status sign.
- Tip: The OLED also shows the device IP at the bottom of the dashboard screen so you can always find it without a computer.
Pin assignments
Board wiring reference| Pin | Connection | Type |
|---|---|---|
| 3V3 | ssd1306-oled VCC | power |
| GND | ssd1306-oled GND | ground |
| GPIO 21 | ssd1306-oled SDA | i2c |
| GPIO 22 | ssd1306-oled SCL | i2c |
Firmware
ESP32// Tiny OLED Desk Command Centre
// SSD1306 0.96" I2C OLED — shows time (NTP), weather (Open-Meteo), and
// accepts short messages sent from a browser on the LAN.
// Edit WIFI_SSID / WIFI_PASSWORD and the location / timezone constants below.
#include <Arduino.h>
#include <Wire.h>
#include <WiFi.h>
#include <WebServer.h>
#include <HTTPClient.h>
#include <time.h>
#include <Adafruit_GFX.h>
#include <Adafruit_SSD1306.h>
#include <ArduinoJson.h>
// ── User-editable constants ─────────────────────────────────────────────────
const char* WIFI_SSID = "YOUR_WIFI_NAME"; // ← edit
const char* WIFI_PASSWORD = "YOUR_WIFI_PASSWORD"; // ← edit
// Timezone offset from UTC in seconds (e.g. UTC+1 = 3600, UTC-5 = -18000)
const long TZ_OFFSET_SEC = 0;
// Daylight-saving offset in seconds (1 hour = 3600; set 0 if your region has none)
const int DST_OFFSET_SEC = 3600;
// Open-Meteo location (decimal degrees)
const float WEATHER_LAT = 51.5074f; // London default — edit to your location
const float WEATHER_LON = -0.1278f;
// ── Pin definitions ─────────────────────────────────────────────────────────
#define SDA_PIN 21
#define SCL_PIN 22
// ── Display config ──────────────────────────────────────────────────────────
#define SCREEN_WIDTH 128
#define SCREEN_HEIGHT 64
#define OLED_RESET -1 // no reset pin wired
#define OLED_I2C_ADDR 0x3C
Adafruit_SSD1306 display(SCREEN_WIDTH, SCREEN_HEIGHT, &Wire, OLED_RESET);
// ── Web server ──────────────────────────────────────────────────────────────
WebServer server(80);
// ── State ───────────────────────────────────────────────────────────────────
String weatherLine = "weather..."; // e.g. "12°C Partly cloudy"
bool weatherOk = false;
String customMessage = "";
unsigned long msgShowUntil = 0; // millis() deadline for custom message
unsigned long lastWeatherFetch = 0;
unsigned long lastClockUpdate = 0;
unsigned long lastIpPrint = 0;
const unsigned long WEATHER_INTERVAL = 10UL * 60UL * 1000UL; // 10 minutes
const unsigned long CLOCK_INTERVAL = 1000UL; // 1 second
const unsigned long IP_PRINT_INTERVAL = 30UL * 1000UL; // 30 seconds
const unsigned long MSG_DISPLAY_MS = 8000UL; // 8 seconds
// ── Forward declarations ────────────────────────────────────────────────────
void connectWiFi();
void fetchWeather();
void updateDisplay();
void handleRoot();
void handleSend();
void showMessage(const String& msg);
String buildTimeLine();
// ── setup() ─────────────────────────────────────────────────────────────────
void setup() {
Serial.begin(115200);
delay(200);
Serial.println("OLED Desk Command Centre starting");
Wire.begin(SDA_PIN, SCL_PIN);
if (!display.begin(SSD1306_SWITCHCAPVCC, OLED_I2C_ADDR)) {
Serial.println("SSD1306 not found — check wiring on GPIO21/22");
// Keep running so Serial diagnostics stay alive; display calls become no-ops
}
display.clearDisplay();
display.setTextSize(1);
display.setTextColor(SSD1306_WHITE);
display.setCursor(0, 0);
display.println("Connecting to Wi-Fi");
display.display();
connectWiFi();
// Sync time via NTP
configTime(TZ_OFFSET_SEC, DST_OFFSET_SEC, "pool.ntp.org", "time.nist.gov");
Serial.println("NTP sync requested");
// Web server routes
server.on("/", HTTP_GET, handleRoot);
server.on("/send", HTTP_POST, handleSend);
server.begin();
Serial.println("HTTP server started on port 80");
// First weather fetch
fetchWeather();
updateDisplay();
}
// ── loop() ──────────────────────────────────────────────────────────────────
void loop() {
server.handleClient();
unsigned long now = millis();
// Reconnect if dropped
if (WiFi.status() != WL_CONNECTED) {
connectWiFi();
}
// Periodic weather refresh
if (now - lastWeatherFetch >= WEATHER_INTERVAL) {
fetchWeather();
lastWeatherFetch = now;
}
// Clock tick
if (now - lastClockUpdate >= CLOCK_INTERVAL) {
lastClockUpdate = now;
// Only refresh display when no custom message is showing
if (now >= msgShowUntil) {
updateDisplay();
}
}
// Clear custom message when timer expires and return to dashboard
if (customMessage.length() > 0 && now >= msgShowUntil) {
customMessage = "";
updateDisplay();
}
// Repeat IP to Serial so the user can find the device
if (now - lastIpPrint >= IP_PRINT_INTERVAL) {
lastIpPrint = now;
if (WiFi.status() == WL_CONNECTED) {
Serial.print("Device IP: http://");
Serial.println(WiFi.localIP());
}
}
}
// ── Wi-Fi ────────────────────────────────────────────────────────────────────
void connectWiFi() {
Serial.printf("Connecting to %s", WIFI_SSID);
WiFi.mode(WIFI_STA);
WiFi.begin(WIFI_SSID, WIFI_PASSWORD);
display.clearDisplay();
display.setCursor(0, 0);
display.println("Connecting...");
display.display();
unsigned long start = millis();
while (WiFi.status() != WL_CONNECTED && millis() - start < 20000UL) {
delay(500);
Serial.print(".");
}
if (WiFi.status() == WL_CONNECTED) {
Serial.println();
Serial.print("Connected. IP: ");
Serial.println(WiFi.localIP());
display.clearDisplay();
display.setCursor(0, 0);
display.println("Connected!");
display.print("IP: ");
display.println(WiFi.localIP().toString());
display.display();
delay(2000);
} else {
Serial.println("\nWi-Fi connection failed — retrying in main loop");
display.clearDisplay();
display.setCursor(0, 0);
display.println("Wi-Fi failed");
display.println("Retrying...");
display.display();
}
}
// ── Weather fetch (Open-Meteo, no key required) ──────────────────────────────
void fetchWeather() {
if (WiFi.status() != WL_CONNECTED) {
weatherLine = "weather unavailable";
weatherOk = false;
return;
}
char url[200];
snprintf(url, sizeof(url),
"http://api.open-meteo.com/v1/forecast"
"?latitude=%.4f&longitude=%.4f"
"¤t_weather=true"
"&temperature_unit=celsius",
WEATHER_LAT, WEATHER_LON);
HTTPClient http;
http.begin(url);
http.setTimeout(8000);
int code = http.GET();
if (code == 200) {
String body = http.getString();
// Parse with ArduinoJson — stream-style to keep heap use low
StaticJsonDocument<512> doc;
DeserializationError err = deserializeJson(doc, body);
if (!err) {
float temp = doc["current_weather"]["temperature"].as<float>();
int wmoCode = doc["current_weather"]["weathercode"].as<int>();
// Map a handful of WMO codes to short labels
const char* cond = "Unknown";
if (wmoCode == 0) cond = "Clear";
else if (wmoCode <= 3) cond = "Partly cloudy";
else if (wmoCode <= 48) cond = "Fog/mist";
else if (wmoCode <= 57) cond = "Drizzle";
else if (wmoCode <= 67) cond = "Rain";
else if (wmoCode <= 77) cond = "Snow";
else if (wmoCode <= 82) cond = "Showers";
else if (wmoCode <= 99) cond = "Thunderstorm";
char buf[40];
snprintf(buf, sizeof(buf), "%.0f%cC %s", temp, (char)247, cond);
weatherLine = String(buf);
weatherOk = true;
Serial.print("Weather: ");
Serial.println(weatherLine);
} else {
Serial.println("Weather JSON parse error");
weatherLine = "weather unavailable";
weatherOk = false;
}
} else {
Serial.printf("Weather HTTP error: %d\n", code);
weatherLine = "weather unavailable";
weatherOk = false;
}
http.end();
lastWeatherFetch = millis();
}
// ── Time helper ──────────────────────────────────────────────────────────────
String buildTimeLine() {
struct tm t;
if (!getLocalTime(&t)) {
return "time sync...";
}
char buf[20];
strftime(buf, sizeof(buf), "%H:%M:%S", &t);
return String(buf);
}
// ── Display refresh ──────────────────────────────────────────────────────────
void updateDisplay() {
display.clearDisplay();
display.setTextSize(1);
display.setTextColor(SSD1306_WHITE);
if (customMessage.length() > 0) {
// Show incoming message — wrap at word boundaries is handled by GFX
display.setCursor(0, 0);
display.println("-- Message --");
display.println();
display.setTextSize(1);
display.println(customMessage);
} else {
// ── Dashboard layout ──
// Row 0: "DESK CENTRE" header (small)
display.setCursor(0, 0);
display.print("DESK COMMAND CENTRE");
// Row 1: time (large)
display.setTextSize(2);
display.setCursor(0, 12);
display.print(buildTimeLine());
// Row 2: weather (small)
display.setTextSize(1);
display.setCursor(0, 42);
display.print(weatherLine);
// Row 3: IP hint
if (WiFi.status() == WL_CONNECTED) {
display.setCursor(0, 54);
display.print(WiFi.localIP().toString());
} else {
display.setCursor(0, 54);
display.print("No Wi-Fi");
}
}
display.display();
}
// ── Web server handlers ──────────────────────────────────────────────────────
void handleRoot() {
String html =
"<!DOCTYPE html><html><head>"
"<meta name='viewport' content='width=device-width,initial-scale=1'>"
"<title>Desk Command Centre</title>"
"<style>body{font-family:sans-serif;max-width:400px;margin:40px auto;padding:0 16px}"
"input[type=text]{width:100%;box-sizing:border-box;padding:8px;font-size:1rem;margin:8px 0}"
"button{padding:10px 24px;font-size:1rem;cursor:pointer;background:#1a1a2e;color:#fff;border:none;border-radius:4px}"
"</style></head><body>"
"<h2>Desk Command Centre</h2>"
"<p>Type a message to display on the OLED for a few seconds.</p>"
"<form method='POST' action='/send'>"
"<input type='text' name='msg' maxlength='64' placeholder='Your message' required>"
"<br><button type='submit'>Send to OLED</button>"
"</form>"
"</body></html>";
server.send(200, "text/html", html);
}
void handleSend() {
if (server.hasArg("msg")) {
String msg = server.arg("msg");
msg.trim();
if (msg.length() > 0) {
showMessage(msg);
server.send(200, "text/html",
"<!DOCTYPE html><html><head>"
"<meta http-equiv='refresh' content='2;url=/'>"
"<meta name='viewport' content='width=device-width,initial-scale=1'>"
"<title>Sent</title>"
"<style>body{font-family:sans-serif;text-align:center;margin-top:80px}</style>"
"</head><body><h2>Message sent!</h2><p>Returning…</p></body></html>");
return;
}
}
server.sendHeader("Location", "/");
server.send(302);
}
void showMessage(const String& msg) {
customMessage = msg;
msgShowUntil = millis() + MSG_DISPLAY_MS;
Serial.print("Displaying message: ");
Serial.println(msg);
updateDisplay();
}“Deploy to device” opens this project in Schematik, where you can flash it to your board over USB.
Related builds
Remix this project
Make it yours in one click
Open a full copy of this project in your own Schematik workspace — diagram, code, parts, and assembly steps included. Swap the sensor, add features, or redesign the whole thing with AI. The author's original stays untouched.